Table Of Content

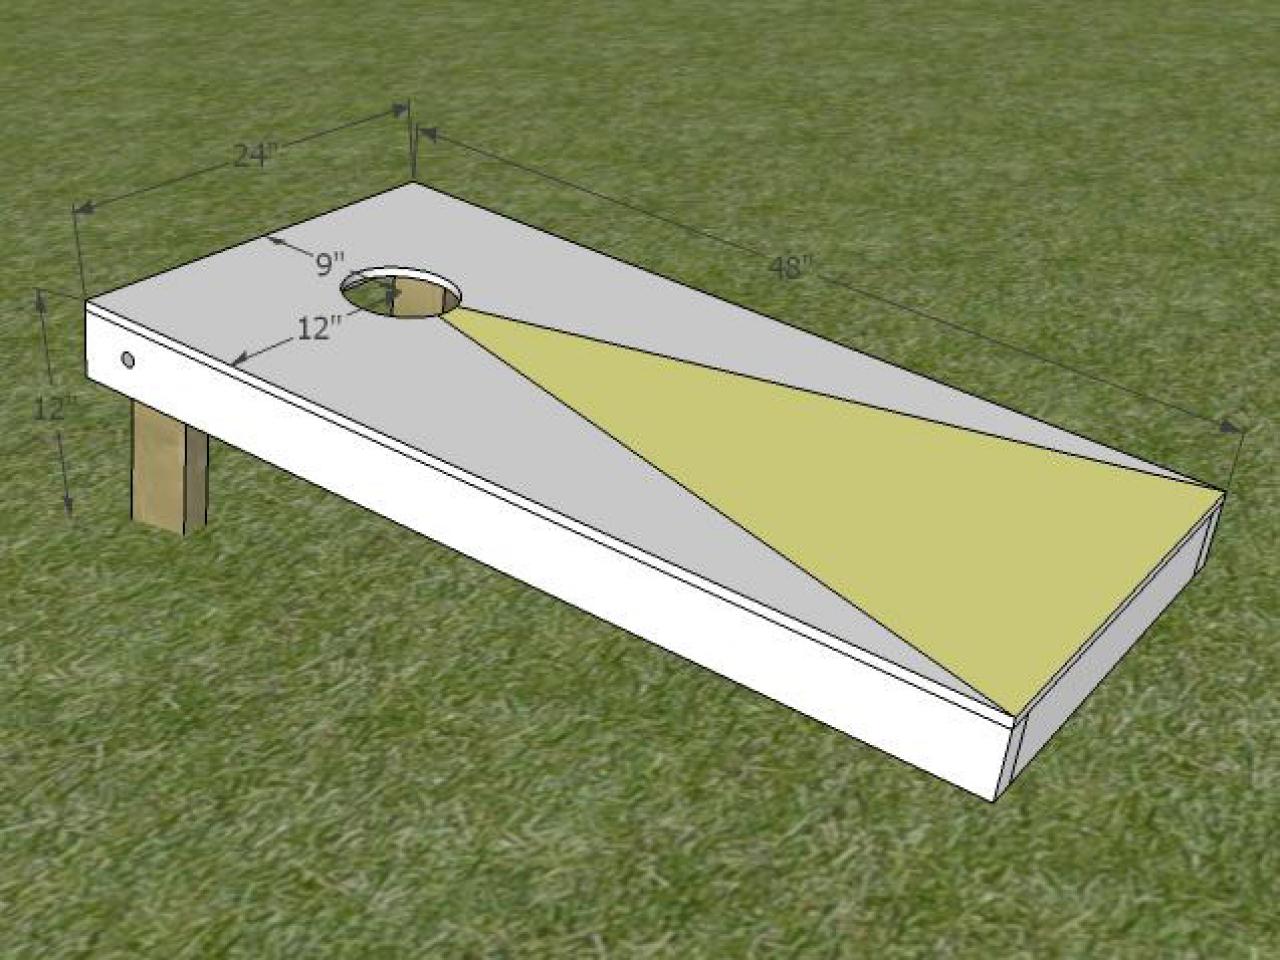
We let that dry for about an hour and then used delicate surface tape to mark off the two areas we already spray painted. Finally, we sprayed 2 coats of Krylon Fusion All-In-One in Matte Beach Glass , waiting 2 minutes between each coat. The outside 22.5″ boards should line up with the edge of the 48″ boards. The two middle boards should be placed 21″ and 27″ from one end. The center of the hole should be 9″ from the top of the board and 12″ in from either side. For the (4) legs, first cut one side at a 25-degree angle with the long side measuring 13″.
DIY Garden Bench Plans You Can Build to Enjoy Your Yard
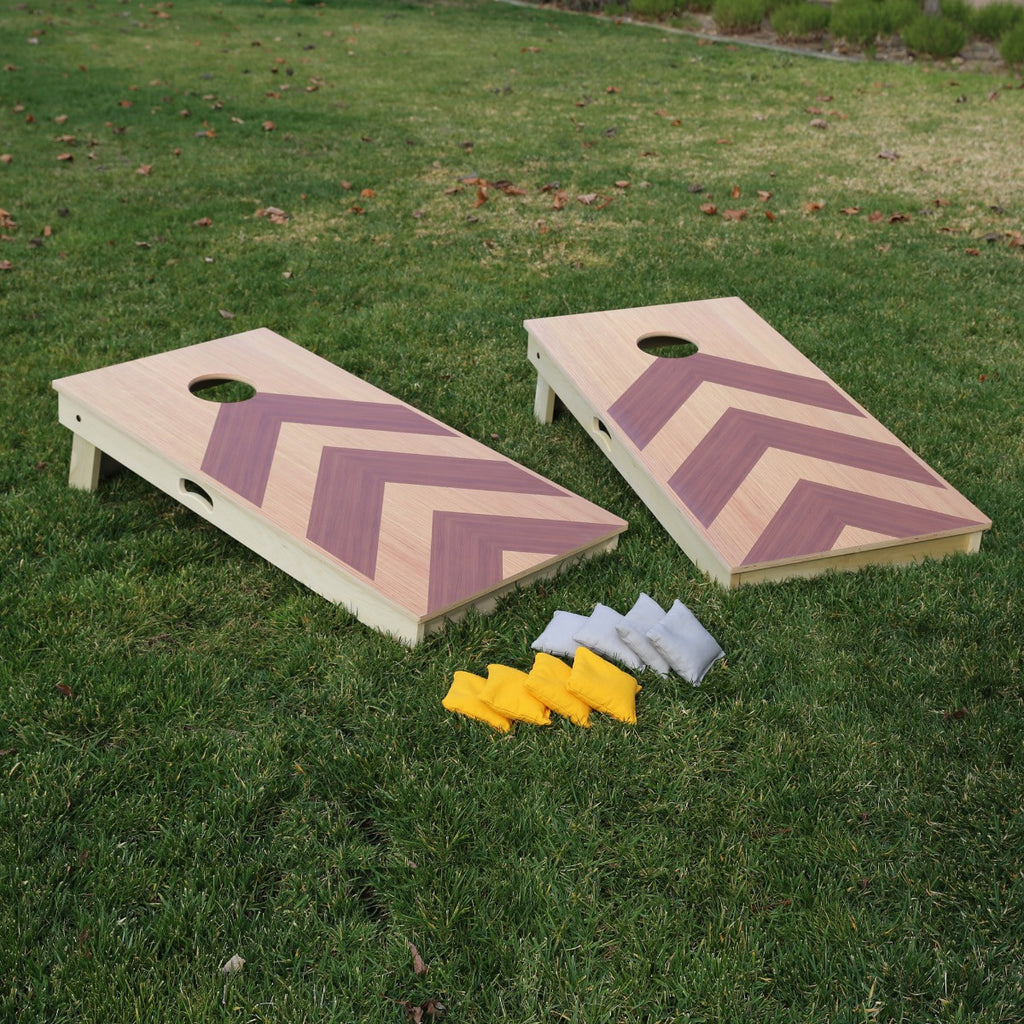
These boards come in a fun, value packed size for recreational game play. Both Krylon Fusion All-In-One and COLORmaxx are great for outdoor use and are extremely durable. Because of this, we usually don’t seal after using this spray paint, but we decided to seal the cornhole boards to help the bags slide a little bit. We like the added fun of being able to knock off other people’s bean bags by sliding across the top. Learning how to make a cornhole game is a fun project the family can take on together.
The Cornhole Sign
Take advantage of this service if you are at a store that offers it and get the 2” x 3”s cut to length. If your store doesn’t cut wood, that’ll be the first order of business. Cut those to length and then pull out your trusty Kreg pocket hole jig. Once you use this thing, I think you’ll find many uses for it past this project. I think it’s the best under $20 tool that you can buy.
Attach the Plywood Board to the Frame
This is another great design for those of you who love Disney. The boards are decorated with lots of fun colors which make it eye catching. Whether you've tossed a few bean bags at a family reunion or witnessed the intense focus of competitive... Before we attach the legs, we’re going to attach a cup holder to both sets and the scoring system to one set of the legs. We also used this color for the legs and cup holders and to paint a stripe in the center of the scorekeeping dowel.
Cornhole Board Wraps
You can do all sorts of designs or you can keep things simple by sticking with lines. We’re going for more of a classic look, so we opted for straight lines this go around. Finally, let’s go ahead and cut out the hole for the cornhole bags. We used this 6″ hole saw that’s perfect for cornhole boards, but you could also cut the hole out with a jigsaw. As the weather starts to warm up, we have all the outdoor projects and yard games on our mind.
For all wildlife lovers, the bear board is an awesome cornhole board design. The wood stripe background with a bear and forest scenery gives the board a perfect wildlife look. It is an ideal cornhole board to play a game of cornhole when camping or spending a weekend in your cabin in the woods. We all love The Star and Stripes; why not get a cornhole board with our flag on it. I mean, it is summertime, cornhole season is at peak, and here comes the 4th of July long weekend. A game of cornhole with your friends and family is a must.
Adorable DIY Bird Bath Ideas That Are Easy and Fun to Build
The easiest tutorial for building your own corn hole game. You'll just need a drill and jigsaw for power tools. Free PDF Printable plans with steo bt step diagrams from Ana-White.com. I like this cornhole board décor idea because frankly, I agree with the motto.
Milwaukee’s Major Cornhole Tournament - Milwaukee Magazine
Milwaukee’s Major Cornhole Tournament.
Posted: Fri, 07 Jul 2023 07:00:00 GMT [source]
The simpler option is to use a 6-inch hole saw bit to cut the hole open. With the hole saw bit chucked into the drill, put the point of the drill bit on the center mark. Squeeze the trigger and apply light pressure, allowing the hole saw to cut the hole. With the holes drilled, attaching the frame boards to each other is a cinch. Run a small bead of glue on the end of a 21-inch board and align the end with the end of the 48-inch board.
Believe it or not, this is a critical step to ensure the board meets regulation standards. Do your best to ensure that the frame stays square through this step. The following step will allow for a bit of adjustment, but it’s best to have as square a foundation as possible. With everyone pairing up and competing to knock each other out of the bracket, there’s plenty of time for good-natured ribbing and awesome memories. When the topcoat is dry, it’s time to attach the skirt.
This makes an easy way to keep track of the score. A small string of battery powered LEDs under the hole to light it up so you can play further into the night. In the future, I will be making a plexiglass rim around the hole to be lit by LEDs. I promise to add that tutorial when I complete that upgrade.
This design is for all those who love the cowboy style. The cigar skull and the guns take you back to the Wild West period. The dark gray border with 5 bullet marks around the hole gives you a feeling like you are doing some shooting.


No comments:
Post a Comment